Wednesday, January 12, 2011

Banana rum cheesecake


For our 10th anniversary, two days after Christmas, I made a banana rum cheesecake. The recipe is courtesy of my friend Ophelia. You can find it on her blog, where she so graciously shares so many of her wonderful recipes.

The cheesecake was scrumptiously rich, with delightful chunks of bananas and laced with rum. I love anything banana; banana cake, banana muffins, banana chips, banana cereal...  you get the drift. Not only was it loaded with banana, but it was topped with a chocolate ganache as well! My kind of heaven... *sigh*

You can find her recipe here, on her blog, where she provides in-depth instruction which is very helpful. The only changes I made was to soak the raisins in the rum first and I left the prepared crust in the freezer for about 15 minutes before topping with the cheese mixture (I didn't have enough time to leave it overnight). I also used walnuts instead of pecans, because they're so hard to find here.

A banana rum cheesecake will no doubt be more exotic and less popular than the usual safe choices like New York cheesecake, or chocolate cheesecake. But for those who like it, they will really love it! I had a guest who was so amazed by it that she asked me if she could order one!

So what are you waiting for? Get the recipe and have a go at it!

Tuesday, January 11, 2011

Christmas penguins


Another order I had the weekend before Christmas was a birthday cake for a Daddy and his two kids. Since their birthdays were near Christmas, Mummy wanted the cake to be both a birthday and a Christmas cake.

I did two tiers of chocolate cake and covered them in light blue fondant. Then I stuck on some white snowflakes.

Making the cake toppers was the fun part. I made three penguins, a daddy one, a girl one and a boy one. The little girl had a pink bow, an orange scarf, and a birthday cake...


Brother had a striped woolly cap and was busy with some snowballs...


while daddy in his blue ear muffs, was in charge of the Christmas tree lights...


Penguins are cute doncha think?

Monday, January 10, 2011

Princess tiara II


So this is the third piece which my friend ordered, together with the high heel cake and the Sesame Street cuppies. It's a princess tiara, similar to one I made almost a year ago.

It's a chocolate cake with fondant covering and a gumpaste tiara. I made the gumpaste tiara weeks ahead, for fear that I would not have enough time to complete all my orders! I had 5 orders that crazy weekend, before Christmas...

I think I've had enough of commercial baking for the meantime... :)

The first tiara cake I made was two-tiered.

Sunday, January 9, 2011

Sesame Street


I love Sesame Street. I grew up watching Big Bird and Mr Snuffleupucus (I have no idea how to spell that!)! So when my friend wanted cupcakes for her 2 year-old, I suggested Sesame Street ones and was so happy when she agreed!

It would have been much, much easier to make them out of buttercream. All you had to do was pipe the fur on with a grass tip. But, I decided to use gumpaste to make hard discs for their faces instead. It would definitely be more time consuming and also more difficult, but I thought they would look sooo much nicer. I love clean, simple and neat designs.


So, first off I made the round'ish' gumpaste discs for the faces a couple of weeks ahead. The discs had to have time to harden so they could sit nicely on top of buttercream swirls without bending.

Then I added the fondant features to the faces. This was the most time consuming (but fun) part.


So, I baked a dozen chocolate cupcakes and topped them with large swirls of silky, vanilla flavoured Swiss meringue buttercream.

The faces went on top, and that was that! :)

I do love these little Muppets!

Thursday, January 6, 2011

High heel cake


A friend of mine wanted a birthday cake for her sister-in-law who was turning 22. She told me that the birthday girl loved shopping and shoes. So I decided to make a high heel cake for her.

I did some research on the net and found a very useful video on YouTube, by The Pink Cakebox, a bakery that does amazing cakes in the US. It comes in three parts, here's the link to the first part, and you will find the links to part 2 and 3 there as well.


So I did as instructed; bought a brand new (cheap of course) pair of  heels and stripped the tops off. Then I used gumpaste to form the gumpaste heel and left it on the real shoe to dry.

I think I rolled the gumpaste out too thin, so when I removed the gumpaste heel from the real shoe weeks later, it broke into two! :(

But no matter, I just glued the two pieces back and used some fondant rolls at the bottom of the heel to support and keep the two pieces together.


The shoebox is made from a coffee flavoured madeira cake and covered with black and white fondant. I used pink fondant for the writing, but it was too light and did not stand out on a white background. Next time I must remember to use darker colours for writing. 

This cake was only one of three which my friend ordered on the same day. They liked this one the best. I liked the Sesame street cupcakes the most. I'll put those in my next post.

Wednesday, December 29, 2010

Gingerbread house


I love gingerbread houses. There's something magical about an edible house covered in a myriad of colourful, enticing candies. It's like something out of your childhood dreams! Wouldn't a life-sized one be amazing? Just like Hansel and Gretel! :)

So anyway, I've never made a gingerbread house before this, only gingerbread men and Christmas trees and such. This year, I decided to try a whole house instead of just wee little men and trees. It's actually not hard to do at all!


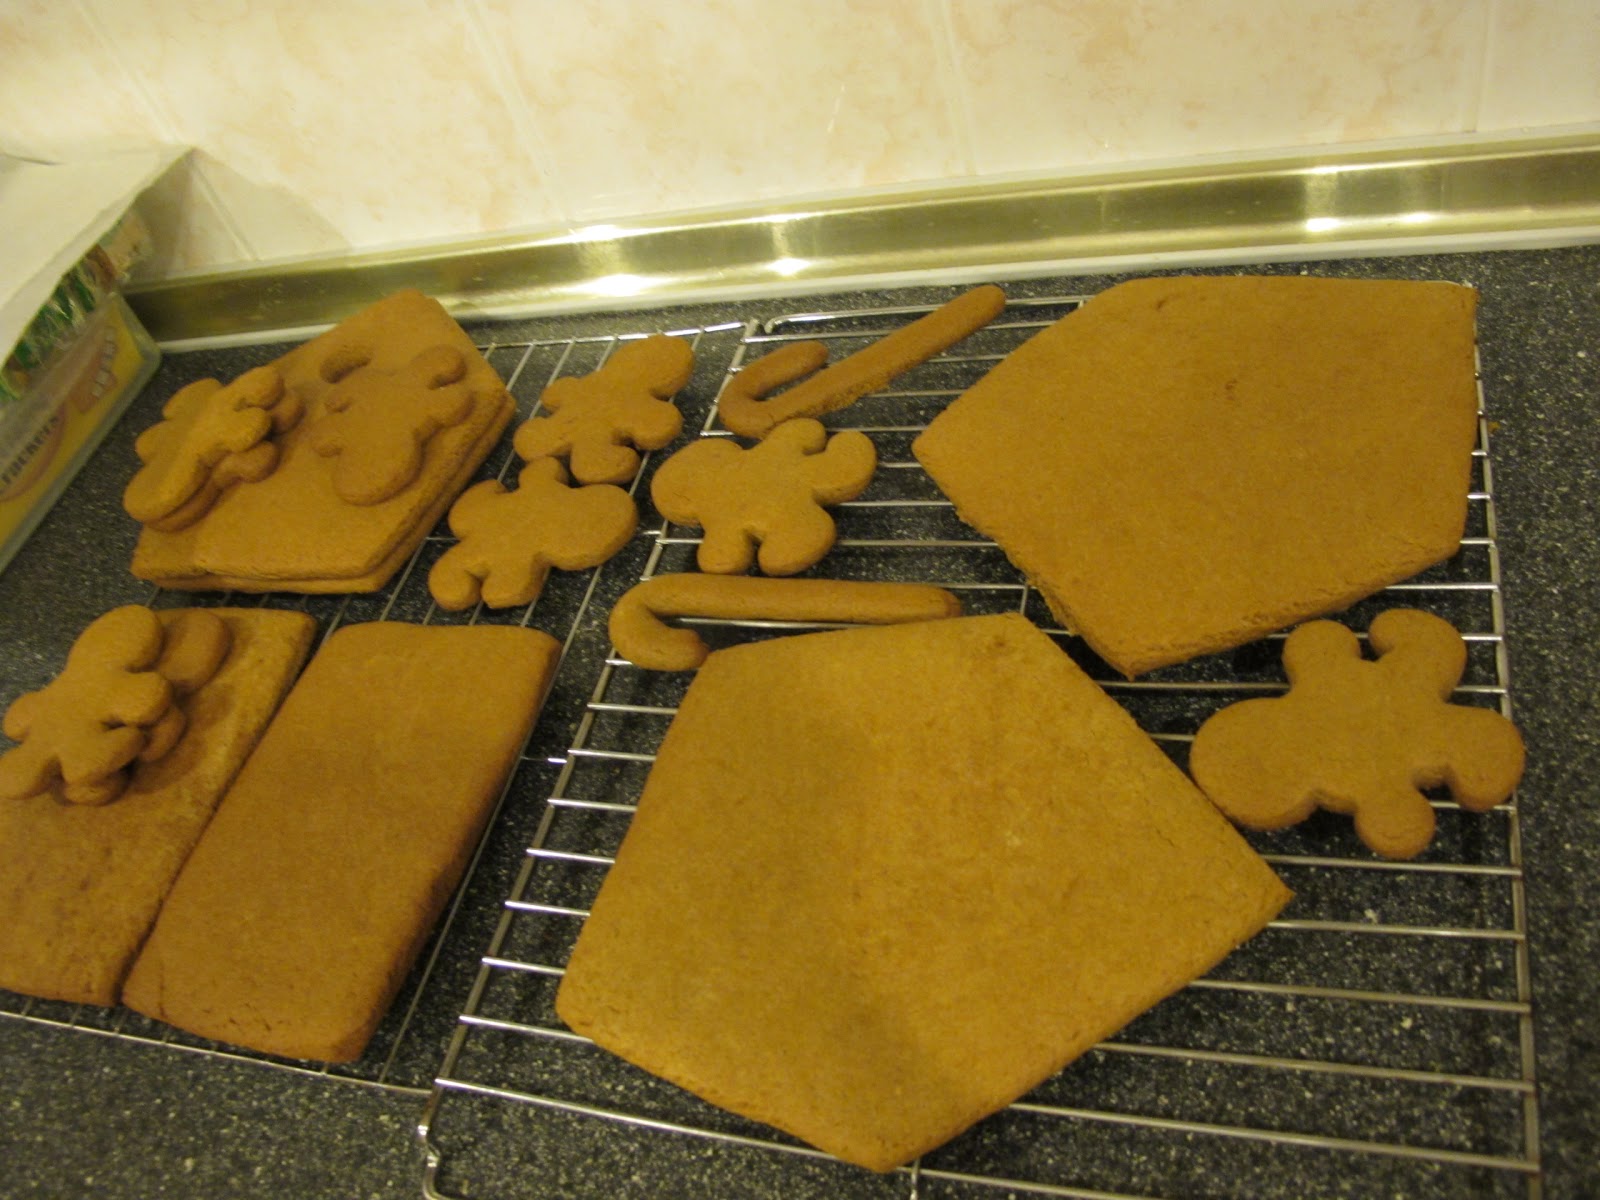
First, I decided on the shape and size of  the house and made some templates from cardboard. A pentagonal shape for the front and back, a rectangle for the walls and another rectangle for the roofs. There were 3 pieces altogether.

Then I made the gingerbread dough following the recipe below.


After rolling out the dough, I used the templates to cut out the shapes. I made two of each shape, so I ended up with 6 pieces. For the front of the house (pentagonal shape), I used a round cutter to cut a hole near the top. I thought it looked cute, like a birdhouse, and the kids could also peep into it.


Then I baked the pieces and let them cool completely. Then, I basically glued them together using royal icing. Royal icing can be made using egg whites or meringue powder. I had some meringue powder, so I used that, because with raw egg whites, there is always the risk of salmonella.

Anyway, I wanted the royal icing to be stiffer, so it would dry faster. I reduced the water, and it was so stiff that my hand-held mixer broke!! I had to continue whisking by hand!


After gluing the structure together, we get to the fun part; sticking on the candies! This is where you can let your imagination run wild and design the candy house of your dreams! :) Just pipe royal icing onto where you want your candies to go and stick on the sweets before the icing dries.

This is definitely a great pre-Christmas activity for the kids. Next year I hope to put in more effort and make some gumpaste decor like candy canes, which will make the houses even more gorgeous!


Anyway, here is the recipe for the gingerbread and also royal icing:


GINGERBREAD

350g plain flour
1-2 tsp ground ginger
1-2 tsp ground cinnamon
1 tsp bicarbonate of soda
100g butter, softened
175g soft light brown sugar
1 egg
4 tbsp golden syrup or honey (use molasses if you want a darker, chewier gingerbread)

Sift and mix flour, ground ginger and cinnamon and bicarbonate of soda into a mixing bowl.

Rub in butter.

Add sugar and mix well.

Stir in syrup and egg.

Mix well to form a firm dough.
Roll to 5mm thickness and cut.
Bake on a greased and floured tray at 180 degrees Celsius for 10-25 minutes or until golden brown.


ROYAL ICING

Royal Icing Using Egg Whites:
2 large egg whites
2tsp lemon juice
3 cups (330g) icing sugar, sifted

Royal Icing Using Meringue Powder:
4 cups (440g) icing sugar
3 tbsp (30g) meringue powder
1/2tsp vanilla/ lemon/ almond extract
1/2-3/4 cup (120-180ml) warm water

Method:
Beat everything in a mixing bowl until stiff and spreadable.
Use more water if you want a runny icing and  less for stiffer icing.

Thursday, December 23, 2010

Music note cake


A friend ordered a cake from me, for the12th anniversary of her music society. She wanted a grand three tier cake with a large music note on top and the name of their society written in Chinese characters and also the number 12. She also requested that the colours of her society; pale green, blue and yellow be incorporated into the design.


I made the music note by first cutting out the shape from styrofoam. Then I covered the styrofoam note in black fondant and left that out to dry. The top tier was also made from styrofoam. That I covered in white fondant and put a pale blue number12 on it.

The middle tier is American chocolate cake. This tier I covered in pale yellow and wrote out the Chinese characters using black fondant. I can't write in Chinese, so my characters were not that great! :)

The bottom tier is butter cake. I covered it in white fondant and stuck on pale green stripes.

The event was covered by a Chinese newspaper, so my cake made it to the local papers! *hooray*

Saturday, December 18, 2010

Bible and rosary


A friend of mine ordered a cake which was to be given to a nun for her anniversary (of becoming a nun). His aunt wanted this cake and she's an interior decorator, so she was very specific with the details.

She wanted an open bible, with pale blue roses and a brown rosary. Wordings were to be turquoise. I'm not too sure of the exact shade of turquoise, but I hope I got the greenish-blue correct! :)

So, I started off with a square cake and carved it into the shape of an open book Then I covered it in white fondant and put a brown rope of fondant around the base. I flattened this rope a bit so it could resemble the cover of the bible.


I made the roses free hand, cause I think for small ones, it's easier to do free hand than to use the cutters. I still need practice at that, but I think my roses came out pretty okay for a first timer.

The rosary was the most time consuming. I had to roll out all the small balls and connect them one by one. As for the small cross at the end, I used a real, clean rosary to indent Jesus on the cross. I was sure He wouldn't mind, since this cake was for a sister who devoted her life to Him. :)


On hindsight, I think the 'pages' are too white. I should have used a bit of brown petal dust to create some shading. However, I unfortunately do not own any brown petal dust... next time I shall try using cocoa powder for dusting... I wonder if that would work or would it ruin the whole cake?!!

So anyway, I do like how this cake turned out. But, if you ask me, I still prefer cute and pretty as opposed to realistic. I love cartoony cakes a la Debbie Brown. I think that's my style.


Wednesday, December 8, 2010

Hornbill wedding


Here's another wedding cake I made for an old friend. After my very first wedding cake, I kinda promised myself not to take on anymore wedding cakes, as it is really a lot of work and extremely stressful. Since it is a once-in-a-lifetime thing, the pressure is really on you to achieve perfection!

Well, anyway, I still found myself saying yes, when my friend asked me to do her cake! :) What can I say? I think I thrive on stress... no stress makes for a boring life no? I love a challenge too anyway, and when I saw her artwork for her wedding invitation, I was hooked!


They chose to go with a really cool 'tribal chic' theme, and the daring colour combination of red and black! I love the design and knew right away that I wanted to hand craft the hornbills. I initially made a prototype, black pair which were too big and too black, and also they did not harden right. Then, after some consultation with the bride, I made another pair which were smaller and more delicate and also red in colour.


These guys are made of gumpaste and are edible, except for the toothpick at the bottom, necessary for anchoring the topper to the cake. It was meticulous work, making them. First I made stencils by tracing the pattern onto a transparency sheet. Then I cut out the pattern, removing the curls inside the wing as well. This then became my stencil. Using this stencil, I cut out two hornbills from gumpaste. I initially wanted to make an extra one just in case one broke or something, but was too lazy in the end! :)

After that, I made the curly pattern in the wings using small ropes of gumpaste. I did think of using royal icing, but was not sure I could get the same shade of red. I was also too lazy to whip up a batch just for this purpose!

Anyway, the cake is American chocolate. The top tier is a styrofoam dummy, because I did not want it to be too heavy, lest the whole structure cave in!! I think the black and  white cake tiers worked very well to set off the red hornbill topper. It was a good contrast.


The bride incorporated a lot of red roses into her wedding and she liked the idea of rose petals around the cake. It helped brighten up the predominantly monochrome cake.

I am so proud to have completed a second wedding cake, but I seriously do think they're not worth all the strife and nerves! So much work goes into the masterpiece which gets displayed for an hour or so only to get demolished! Thus, I will once again try my best to not get tempted to attempt another one!! :) Good luck to me...

Fairy and flowers


So I've kinda started making cakes for sale now. I'm taking it slow, as I'm still not sure if I can handle the workload with the limited free time I have. Now it's mostly just orders from friends, so it's not as daunting... friends are more forgiving!! :)

Well, anyhow, a friend wanted a fairy cake, like the last one I made, except with lots of spring flowers. She also wanted the cake to be in soft pastel shades. It was for her little girl who would also be dressed up in fairy wings for her big day! How adorable...


I'm trying to make my models more refined and less chunky. Thus, I'm adding more gum into my gumpaste so I can make slimmer limbs and torsos.

 The flowers were pretty easy to make, I used the blossom cutter/ ejector thingy. I had to make a whole bunch of them though, to cover the cake. I didn't count, but there were definitely more than a hundred... maybe two?

For her skirt, again I used the large daisy cutter, but this time I made it two layers, so it could be two-toned which is so much nicer, in my opinion.


I'm also very happy that I've learned how to use my FMM lower case alphabet cutters. The last time I tried using them, the fondant kept getting stuck, and I got really frustrated. This time I used plenty of cornstarch to make sure it wouldn't stick, and it turned out to be quite easy to use! I love the letters produced using these cutters!


So here's the fairy and flowers cake...


Related Posts with Thumbnails