Showing posts with label gumpaste. Show all posts

Sunday, March 17, 2013

Elmo for Lara

So far the most popular children's character for cake orders I've received is.... Elmo!


So here's another Elmo, this time for Little Lara, all the way in KL! He was made from rice krispies treats and gumpaste, and was carefully hand carried on the plane.


When Elmo got there, all Lara's mummy had to do was to plop it on top of a gorgeous cake made by another friend.

Here's a nice photo of the complete ensemble, taken by a professional photographer:


Wednesday, October 10, 2012

Boboi Boy


So there is this popular cartoon in Malaysia called "Boboi Boy". It is a cute superhero, but quite a complex one, so when a customer ordered it, I was intrigued by the challenge!

Obviously, the one component which I spent the most time on was the Boboi Boy figurine itself. Luckily I started a week earlier on him, because at the last minute, my client moved the date of the party forward by one day!

The decor on the cake itself was kept simple, as I did not have sufficient time to dwell on it for too long. The figurine turned out great! I wanted a more lively pose, instead of the usual standing straight or sitting pose. It was made of gumpaste and had a wire frame inside.


 There were some stress cracks showing by the time of pick-up, but nothing major. I think I will have to plan more carefully next time I use a wire frame for an asymmetrical figurine. There will be places where there is more sagging, so all these have to be taken into account when building up the figurine. Just to be sure the stress cracks did not get worse during transporting, I placed a ball of blue fondant (same colour as the cake covering so it would be less noticable) under the figurine for support.

The cake was an 8" chocolate cake covered in fondant. The Boboi Boy, the no. 3 and the stars are made of gumpaste. Initially I had other ideas for the border round the base of the cake, but since the order was put a day forward, an emergency ribbon did the trick!

The cake had to be driven to Santubong, where the party was held. That's a 45 mins drive away, and I was so relieved to find out that it had survived the journey! Hurray!

I'm very proud of this figurine. It is one of my favourites so far.


Wednesday, September 26, 2012

Elmo for Farees


So this was one of those rare orders which I did for a client whom I did not previously know. (Most of my cakes are for family and friends)

She wanted an Elmo cake, like the one I did previously, but a larger, two tier version.It was for her son's first birthday. First birthdays are always more special don't you think??

The last time I made an Elmo using rice krispies treats, I covered him with red royal icing. It was a pain to pipe all the red fur using a star tip. Just colouring the royal icing a deep red was already a headache. So this time I tried a different approach, which I must say turned out very well!

So I moulded Elmo's body, head and arms using rice krispies treats. Then I covered the pieces in red gumpaste and pieced them together using toothpicks and satay sticks. The resulting surface was bumpy, and it replicated fur very well! The eyes and nose were balls of gumpaste stuck on with water and more toothpicks.

It turned out to be quite a sturdy structure and I was very happy indeed!


So both tiers were chocolate cake and were quite heavy in the end. I am also quite happy with the ganaching on this cake. The surfaces were flat and edges sharp.


The no.1 and the ribbon curlicues were made from gumpaste and everything else was fondant. I think I've found the perfect way to make Elmo and don't mind making him again!


Friday, May 4, 2012

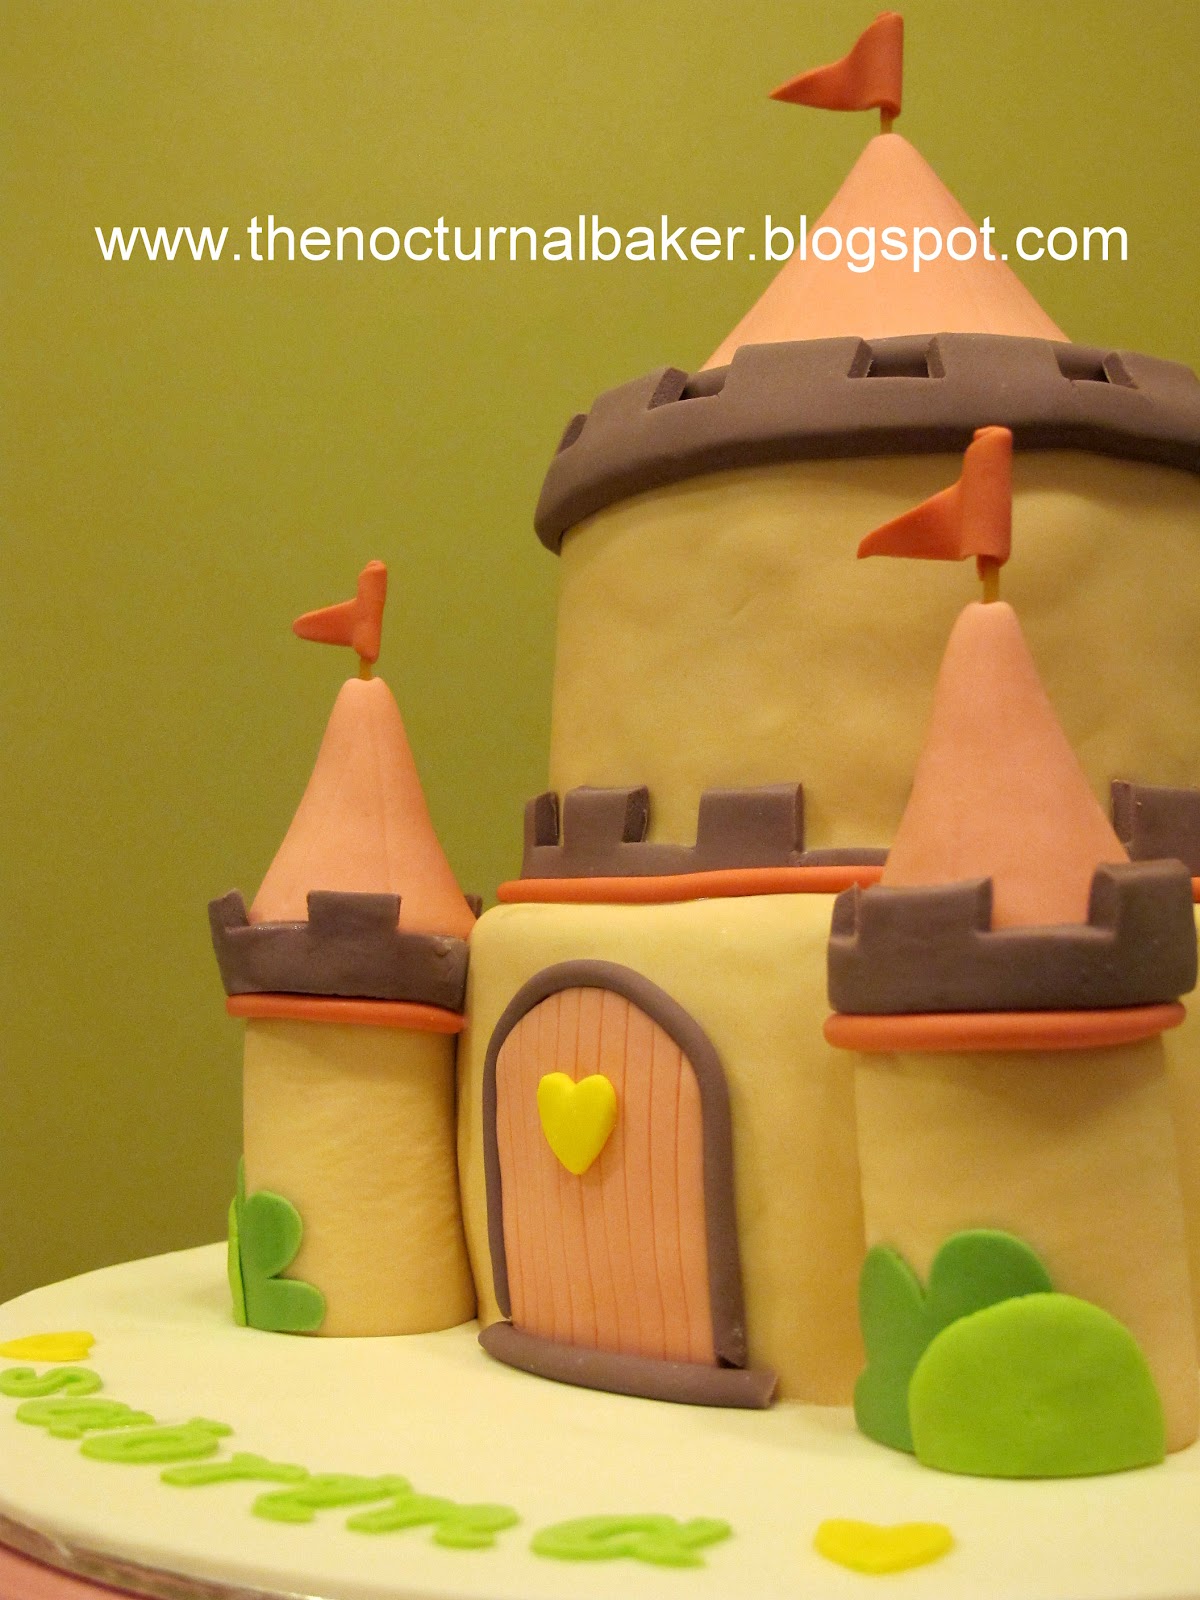
Pretty Castle


My daughter Claire was invited to a birthday party. I didn't know what to get the birthday girl, as usual, so I thought I'd make the cute princess castle which was on the invitation card. It was simple and pretty!


The cake is a small 6" chocolate cake at the bottom and the top tier is an even smaller 4" round chocolate cake. The two towers are purely gumpaste. The flags are made of modelling paste.


Modelling paste is fondant strengthened with CMC (carboxymethylcellulose) powder. I think I prefer CMC to gum tragacanth, as it can be used instantly after mixing, unlike gum, where you have to let it rest for a few hours after mixing before you can use it. Since I am forever lacking enough time, anything that saves time gets a thumbs up from me!


It's funny how when I first learned about CMC, it was for a totally, totally different use! It was our group project in uni (pharmacy degree), we were doing different drug delivery methods and we got ocular inserts! It means we had to explore the fairly un-used method of delivering drug into the eye by using eye inserts! (ie. putting something into the eye like contact lens)

So we dissolved the medicine and added CMC to thicken and bind it together and let it dry into a paper thin piece of medicine which could be put into the eye! Cool eh? Unlike eye drops, it could dissolve slowly, thus delivering drug steadily into the eye, over a longer period of time. A guy from Pfizer came and judged ours the best project and we got free Pfizer t-shirts! lol!

And here I am now using CMC to make cakes!! Which I enjoy so much more by the way!! ;)

Okay, sorry for the detour, back to the cake...


For the name, I used FMM tappits. The tappits can be a pain to use, but if you know these simple secrets, it becomes a breeze!

1. use gumpaste, not fondant
2. roll it out really thin
3. use plenty of cornflour, on the top and bottom of the gumpaste and also flour the FMM mould!

The pretty alphabets you get in the end are definitely worth it!


Monday, January 9, 2012

My Little Pony


I have more confidence now to accept orders which seem trickier. So, when a request came in for a 'My Little Pony' cake, I accepted. An upright pony and a free standing rainbow would have been disastrous a year ago, but now it was a possibility!!


So my friend wanted a Little Pony cake for her daughter. She gave me a picture to work with and specifically wanted a rainbow, a pony and the number 9. I kinda stuck on the number 8 before I realised my mistake and luckily it hadn't stuck on fast yet! Heh...

Well, the rainbow was made from ropes of pastel coloured gumpaste. I threaded the ropes with wire for extra support and bent them into a rainbow and left them to dry for a couple of days.


The pony was kinda tricky and I just winged it. I especially love how the tail and mane turned out. The curls and colours are really pretty. I used the same technique Lorraine taught us for making hair. The butterfly tattoo on the butt and the heart on the hoof was a failure though. I need to work on my painting techniques. The borders are not well defined and the color ran.


In the end, when everything came together, I was satisfied. The pink of the cake and the purple of the cake board was a little dull though. That's another area I need to work on, colouring my fondant.

Tuesday, December 20, 2011

60th Birthday


A friend of mine wanted a cake and cupcakes for her dad's 60th birthday. She wanted a simple cake and cupcakes decorated with all his favourite things.

The cake is a coffee cake which I first covered with a dark chocolate ganache. Then I covered it in white fondant and added some gold ribbon round the bottom of the cake. The number 60 was made a week earlier from gumpaste. I was worried that gumpaste alone would not be strong enough to withstand the transportation process, so I used wire as well. I made gumpaste ropes and pushed wire into them. Then I bent the wired gumpaste ropes into the figures 6 and 0. I let them harden for a while, then dry dusted them with gold luster powder. It was quite messy, and I ended up with gold fingers!! :)


The cupcakes were Red Velvet cupcakes with cream cheese frosting. The cream cheese frosting recipe which I use has a high water content, (because I use cream) so the fondant decorations which I placed on top of the cream cheese frosting swirls started to melt!! 

I was horrified when my fondant discs started to melt and droop over the cupcakes!! But luckily they did not disintegrate totally and were still kind of acceptable, as long as I switched off my OCD mode!! lol!

Note to self: fondant on cream cheese frosting is a no no!

So my friend gave me a whole list of stuff  (fondant decor) I could put on the cupcakes. These included his children and grandchildren, and other things like cars and pets. I loaned her my cupcake stand, so the cake went on top and the cupcakes at the bottom. I do not have a photo of the final assembled display, but here are the pics I did take;


Saturday, December 17, 2011

Precious moments


Google Precious Moments and you will find these pretty, innocent, sweet characters.

A friend of mine loves Precious Moments characters, so she ordered a Precious Moments cake from me for her own birthday! :)


I started early on the little girl figurine, just in case there were any disasters, I would have time to redo!

My class with Lorraine McKay helped a lot when it came time to do the figurine. It was very time consuming, but the results were good. Since the little girl was so cute, I didn't want to make the cake too 'busy' with too many decorations. The focus would be on the figurine.


Simple cakes with few adornments are harder to make, because that means you must cover your cake flawlessly, as you cannot hide blemishes with decorations. So, I made sure I ganached the cake well, as that is the basis of all neat, flawless, fondant-covered cakes.

My cake turned out quite well, and although it was one of my best coverings, it was still far from perfect! :) I need plenty of ganaching practice if I ever hope to achieve that elusive, perfect, smooth finish!

Saturday, December 10, 2011

Thomas the Tank Engine


Next up was the Thomas train birthday cake I made for little Tyler who was turning 2. His mummy wanted a two tier cake with Thomas on top.

So the cakes were made of chocolate cake and frosted with chocolate ganache. The bottom tier was made from two 8" square cakes and the top from two 6" round cakes. It was a lot of cake and the whole creation turned out surprisingly heavy!

For the bottom tier, I made a gift box with ribbon design. For the top tier, I created a drippy icing effect round the top of the cake.


Thomas took the most time to complete. He was made from gumpaste and I started work on him a few days ahead of the birthday party. It was quite detailed and I'm happy with the result. It is fully gumpaste and totally edible.


Next time, I might consider using styrofoam as a frame on the inside of Thomas. That would give a better shape and stronger and sharper edges. Though the novelty of it being edible would be gone.... Hmmm... should I?

 Anyway, I don't do many boys' cakes, as most of my kids and sisters' kids are girls!! So it was nice to work with bold colours like dark blue and red for a change instead of the usual pinks and purples! :)

Thursday, October 20, 2011

Barney and Friends

Sorry for the headache-inducing, neon colours... I got carried away with Picasa!! :)

I've taken ages to get around to blogging about my cakes that I've pretty much forgotten who I made these for! :)

The big boss

Anyway, they're chocolate cupcakes with chocolate ganache frosting and the Barney and friends figures are all made from gumpaste. I used some Barney pictures which I Googled as a reference when creating the figures. That's all I can remember and I'm too lazy to refer to my notebook! heh...


So I'll leave you with the pictures! ;)


What's up doc??


So my little boy Solomon celebrated his birthday at home with the Bert and Ernie cake. Now he needed another one to bring to school. I let him choose what he wanted from my Debbie Brown 'Cartoon Characters' book. He was switching between Barney, Thomas the Tank engine and Bugs Bunny. Nearing his birthday, he finally settled on Bugs Bunny. (Mummy might have influenced him a bit, as it's much simpler to make!! hehehe)


The cake is quite easy to make as it's basically just a mound (no corners or edges!) covered in small rolls of orange fondant with a small Bugs on top. I don't even have to cover the cake with a fondant sheet!

I made a madeira cake, which is firm and thus the best for cakes that have to be carved. Bugs was not too hard to create and the carrots were a piece of cake (pun intended), though still a bit of work because of the sheer number of them!


As usual, I'm very happy with the designs from my Debbie Brown book. I'm always waiting for an opportunity to try out another one of her creations!

Saturday, October 15, 2011

A little bit of everything


So I had this customer from out of town who wanted some cuppies for her husband's birthday. She could not decide what to ask for and wanted something for everyone in her family and so she came up with a list of 3D figures. I usually do a whole set with a single theme, but seeing as she was from out of town and was going to pick up the order while in transit from her hometown to Kuala Lumpur, I did not have the heart to turn down her request.

Anyway, here are the photos. I've done most of them before...


Thursday, September 15, 2011

Bert & Ernie's Great Adventures


I grew up watching Sesame Street. I can still remember most of the characters and the songs they sang! Kid's nowadays don't really know what Sesame Street is, but they do know the presently popular spin-offs like Elmo, of course, and Bert & Ernie's great Adventures.

My youngest, Solomon, loves watching Bert & Ernie's Great Adventures every weekday after lunch at Grandpa's place. Bert and Ernie are no longer Muppets, but clay animation, like Shaun the Sheep.


Since I have a special place in my heart for Sesame Street characters, I grabbed the opportunity to make a Bert & Ernie cake for Solomon's birthday. I love it when I get to decide what I am going to make! Hahaha...

So anyway, this cake was also a bit rushed because it was for the party which Solomon shared with Eva. I had to make this cake as well as the Fairy castle one for the same day.


It turned out pretty good, though I only wish I had time to cover the cake board with more black fondant and add in some stars so that their bed looks like it's galloping though the night sky!! That would've been awesome.

So the cake is a small rectangular chocolate cake and is covered in fondant. Bert and Ernie and the bed's headboard are made of gumpaste. For this design, I referred to a picture I had Googled earlier.


Bert and Ernie are adorable, and I especially love Ernie's rubber duckie!!

Tuesday, September 6, 2011

Fairy Castle


So for her birthday party at home, Eva wanted the Rainbow Fairy Castle cake which she say in my Debbie Brown book. It's a very elaborate design, a large castle with many towers and seven fairies plus a rainbow!

I didn't think I could pull it off, because Eva was celebrating her birthday with Solomon, which meant I had to make two cakes! So I told her I had to make it smaller  and with only one fairy and also without the rainbow! Luckily she was very understanding and not disappointed at all and was very happy to have a castle cake.


I worked on the cakes right up to the last minute before the party! I'm so glad Eva really loved her castle and the blue fairy she chose from the seven fairies!

The whole thing, especially the fairy was a pretty rushed job, but turned out quite alright. She's a little top heavy, but I love her curly hair.

Related Posts with Thumbnails