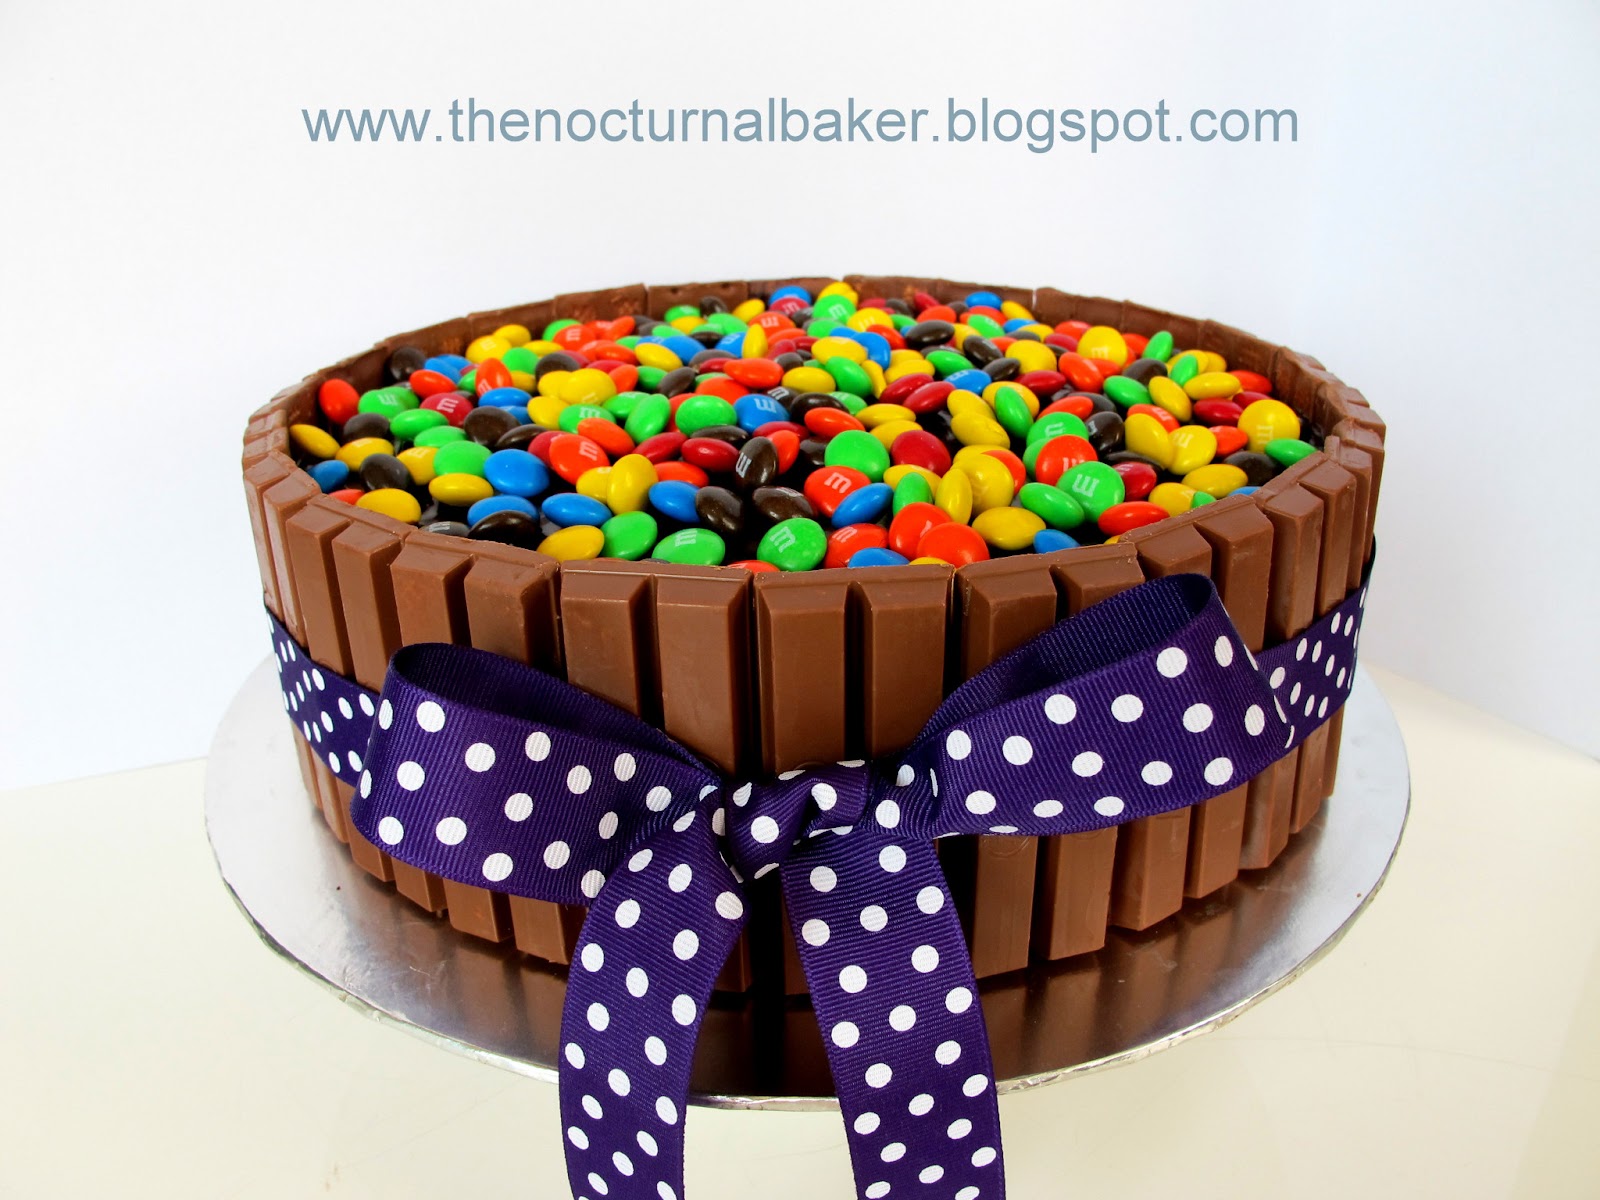
Kit Kat cakes can be found all over the internet. When I was looking for something easy to make, yet impressive, I decided the Kit Kat cake fitted the bill.
This was for my daughter Claire to bring to school for her birthday celebration. It was an 8" dark chocolate cake, covered with Belgian chocolate ganache! Then I stuck Kit Kats round the sides and topped it with plenty of M&Ms! A pretty purple polka-dot ribbon completed the look. It was a chocolate lover's dream come true!
I love the look of this cake! It makes kids and adults alike gasp in delight! And the taste? Chocolate nirvana....
So this was one of those rare orders which I did for a client whom I did not previously know. (Most of my cakes are for family and friends)
She wanted an Elmo cake, like the one I did previously, but a larger, two tier version.It was for her son's first birthday. First birthdays are always more special don't you think??
The last time I made an Elmo using rice krispies treats, I covered him with red royal icing. It was a pain to pipe all the red fur using a star tip. Just colouring the royal icing a deep red was already a headache. So this time I tried a different approach, which I must say turned out very well!
So I moulded Elmo's body, head and arms using rice krispies treats. Then I covered the pieces in red gumpaste and pieced them together using toothpicks and satay sticks. The resulting surface was bumpy, and it replicated fur very well! The eyes and nose were balls of gumpaste stuck on with water and more toothpicks.
It turned out to be quite a sturdy structure and I was very happy indeed!
So both tiers were chocolate cake and were quite heavy in the end. I am also quite happy with the ganaching on this cake. The surfaces were flat and edges sharp.
The no.1 and the ribbon curlicues were made from gumpaste and everything else was fondant. I think I've found the perfect way to make Elmo and don't mind making him again!
Next up was the Thomas train birthday cake I made for little Tyler who was turning 2. His mummy wanted a two tier cake with Thomas on top.
So the cakes were made of chocolate cake and frosted with chocolate ganache. The bottom tier was made from two 8" square cakes and the top from two 6" round cakes. It was a lot of cake and the whole creation turned out surprisingly heavy!
For the bottom tier, I made a gift box with ribbon design. For the top tier, I created a drippy icing effect round the top of the cake.
Thomas took the most time to complete. He was made from gumpaste and I started work on him a few days ahead of the birthday party. It was quite detailed and I'm happy with the result. It is fully gumpaste and totally edible.
Next time, I might consider using styrofoam as a frame on the inside of Thomas. That would give a better shape and stronger and sharper edges. Though the novelty of it being edible would be gone.... Hmmm... should I?
Anyway, I don't do many boys' cakes, as most of my kids and sisters' kids are girls!! So it was nice to work with bold colours like dark blue and red for a change instead of the usual pinks and purples! :)
I made another Elmo cake for a friend's daughter's second birthday. I got the design from a photo I found on the internet. It was on someone's blog but the baker was not credited.
A few days beforehand, I made colourful gumpaste curliques and also covered a 12" cake board in yellow gumpaste. By the time I needed them, they had dried nice and hard.
Then the day before, I made an 8" round chocolate cake and carved it into the oval, Elmo shape. From the cake scraps, I made cake ball mixture using melted butter, icing sugar and cocoa powder. I then used the cake ball mixture to make two small round balls and an oval ball for Elmo's eyes and nose. I refrigerated the balls so that they could harden up. After crumb coating the cake with cream, I also refrigerated it for a while for it to form a crust.
That night, I covered the two small round balls with white fondant for Elmo's eyes and covered the oval ball with orange fondant for his nose. Then I covered the whole face with red fondant and also made his hand entirely out of fondant. I then scratched plenty of lines into the fondant for Elmo's fur.
The eyes and nose were then put into place and two small circles of black fondant were added to his eyes. I then worked on the other details like the party hat, mouth and the green banner. The confetti were sprinkles which I stuck onto the board with icing. I also used icing to write the wordings on the green banner.
I do love this Elmo, and I hear the kids loved it too! My friend sent me a photo of poor Elmo, after being attacked!
The poor guy survived a whole two minutes after being introduced to the kids! :)
The only thing that bugs me is that I made his eyes and nose a little too big. But he's still cute all the same!
Last Saturday we celebrated my niece Annalisa's 2nd birthday. She so small and adorable and sweet, I figured a fairy cake would be just the thing for her!
The cake is a chocolate cake as usual, two 6" rounds stacked on top of each other. They're filled and crumb coated with chocolate buttercream. I covered the cake with white fondant and added circles of pink, pale pink and yellow fondant. For the border, I made fondant balls of the same colours.
I handcrafted the fairy a few days ahead so that it would have time to set. I love how the hair curls turned out. I was going for a cute pixie cut. Her skirt was made using the large daisy cutter.
Here are her teensy wings at the back. I used an ivy leaf cutter to cut some white gumpaste and cropped off the top part. Then I folded it a bit and when it dried, stuck it on upside down.
I made some other desserts to go with this cake which I'll detail on my next post!
A friend requested I make an anniversary cake for her Aunt and Uncle. Initially, I declined, as I was busy that same weekend with the Kitty cake. However, the night before, as I baked the cake and cuppies for the Kitty project, I overestimated, doubled the recipe and ended up with too many cuppies and an extra cake!
The extra cuppies I froze so that the kids could bring them to school over the week and I thought I had better not keep the extra cake as well, as I do not want my kids to feed on too much sweet stuff!
So, I asked my friend if she still needed that cake and she did. Since I had a gumpaste bow I had made ahead of time, I turned the cake into a colourful gift.
The cake is the usual American Chocolate. There are two 6" rounds, leveled, torted and crumb-coated with chocolate buttercream. I covered the cake with orange fondant and stuck on two strips of yellow fondant for the ribbon. Then I placed circles of green fondant for the wrapping paper and placed the bow and gift tag. The "Happy Anniversary" is written with a red edible ink marker. I'm still not crazy about my penmanship...
Anyway, I do love the colour combination here. Really funky and cheerful! Hope they liked it!
I made this cake for myself, Sis no.2 and another 2 friends. It was for a lunch where we were celebrating our birthdays, cause the four of us are all October babies.
I'd been wanting to try out the circles design for a while, because I think it looks so classy and retro chic. So, a birthday lunch for four women was just the right occasion, in my opinion!
Anyhoo... I covered the cake in pink fondant and stuck white circles all around the sides. Then I made a small rope from chocolate fondant and wrapped it around the base of the cake. For the top of the cake, I placed a scalloped circle of brown fondant and on top of that, positioned three simple 5-petaled flowers which I had made ahead of time from gumpaste. I love the decadent look of the final product. This is truly one of my favourite designs.
The cake was a gorgeously delicious Mississippi Chocolate mud cake. I think this is the best mud cake I've tasted yet. It is dense and rich, yet not too wet or muddy and contains whiskey (I stole some of Hubby's Chivas!) so it tastes better after a few days.
It's also so easy to make. The thing I like best about mud cakes it that you have to melt the butter, so it's not necessary to wait hours for it to come to room temperature after fishing it out of the refrigerator. I usually bake on impulse, so without planning ahead, my butter is usually still rock-solid sitting in the fridge when I'm itching to bake a cake!
I found this recipe in anAustralian Woman's Weekly magazine. It is one of their top ten all-time reader's favourite recipe. It is definitely a must-try. Here it goes:
Grease 23cm square slab pan, line base with baking paper. Combine butter, chocolate, sugar, water, whisky and coffee powder in medium pan; stir over low heat until chocolate is melted. Transfer mixture to large bowl; cool. Stir in sifted flours and cocoa, then eggs; pour mixture into prepared pan.
Bake at 160°C for 1¼ hours. Stand cake 30 minutes; turn onto wire rack to cool. Serve dusted with sifted icing sugar.
Doesn't it sound way too simple?? Simple ingredients and simple method, to produce a mind-blowing cake! What are you waiting for? Go raid your liquor cupboard!
So a while ago, I was browsing through this book my sis gave me. It is loaded with cupcake recipes and I really wanted to try making a good chocolate cupcake. However, they all sounded yummy, so how was I to know which recipe was the best? There are no pictures and no descriptions of the end product, so the only thing to do, was to try them all!!
I picked out four recipes:
1. Dark Chocolate Cupcakes
2. Fudge Cupcakes
3. Chocolate Mousse Cupcakes
4. Luxury Chocolate Cupcakes
I was rather disappointed with the recipes, except for one, no.3; Chocolate Mousse Cupcakes. All the other cupcakes were not chocolate-y enough, though no.4 did have very good texture. As a self-confessed chocoholic, one rule always prevails: "the more chocolate the better"!
Clockwise from bottom left: No.1, 2, 3 then 4.
As you can see, no.3 is the darkest one, simply because it has the most chocolate content. In fact, it's just plenty of melted milk chocolate with eggs and just a bit of flour. It is actually more like a self-saucing chocolate pudding and would do better in ramekins (individual oven-proof ceramic bowls) rather than paper cases. It is deliciously dense, sticky and gooey and seriously super-chocolate-y (just look at it's liquid centre!!)... any 'chocolate-ier' and you might as well just eat the chocolate bar!
So anyway here's the recipe if you want to give it a shot;
Method:
1. Preheat oven to 160C and line cupcake baking tray with paper liners.
2. Break chocolate into a bowl and place over small saucepan of simmering water until chocolate has melted. Remove from heat.
3. Stir in the flour and eggs and whisk well. Fill paper cases to about 3/4 full.
4. Bake for 10-12 mins until the sides of the cupcakes are set, but the insides are still liquid.
5. Remove from the oven and leave to cool for 5-10 mins. Remove the cupcakes from baking tray and allow to cool. (I prefer them hot and gooey though...)
Phew! I'm so proud to have completed my very first wedding cake last Saturday!
I must thank my friend Michelle for having such confidence in me that she let me make her wedding cake! I mean it's not like a birthday cake, which one has annually... it's a once-in-a-lifetime wedding cake!!
Fortunately this was her second wedding dinner, which was held at our hometown. The main dinner was the more lavish affair and was held in KL. So that took a bit of pressure off me; at least she already had a nice professionally-made cake in the first event, so if mine didn't turn out too good, it wouldn't matter as much! Well, that was my reasoning anyway...
When Hubby and I came back from our diving holiday to Sipadan, I had only one week left to complete the huge (on my scale; mammoth!) project.
Over the week, I baked many cakes and made plenty of chocolate buttercream. The cake baking was the most time consuming, because I only have one wee oven, and had to bake them one at a time. The 12" cake tray almost couldn't fit into my oven!
So anyway, the bottom tier was two 12" round American chocolate cakes. The second tier was a 10" round American chocolate cake. The third, extra-wide tier, was three 8" round orange madeira cakes. The final top tier was made of styrofoam because I did not want my nightmares of the wedding cake crashing down to come true! I seriously doubted my engineering skills, so even though I always prefer my whole creation to be edible, I had to compromise this time. There was too much at stake!
The two separators were also made from styrofoam and covered in yellow gumpaste. I cut all the styrofoam used by hand, with the aid of a craft knife. It was a lot of hard, messy work, and if I ever do this professionally, I am definitely getting a styrofoam cutter machine thingy!!
So over the week, I cut the styrofoam parts and covered them in gumpaste first, then baked the cakes whenever I had some free time and lastly covered the cakes in fondant. I was doing the fondant decorating right up to a couple of hours before the wedding dinner. Then Hubby and I went early to set up the tiers and to put the finishing touches, i.e.: the real orchids.
I did try making a gumpaste orchid, but it was so much work and too time-consuming that I decided to use real ones. I figured mother nature was a better artist and since we have orchids in abundance here, it would actually be a shame to use fake ones!
During the dinner that night, I was still struggling to push thoughts of wedding cake avalanches out of my mind. Boy was I so totally relieved when the couple finally cut the cake without any untoward incidents!! The cake was then safely disassembled and served to guests.
I must also say here that I couldn't have done it without Hubby's help! He came back one night after a World Cup session to find me frantically fussing over the extra-wide tier! I had covered it in fondant and it cracked and tore at the edges! I was in despair! I did not have the energy nor the extra fondant to redo it and neither could I leave it as it was! Thank goodness Hubby came up with a solution which saved the cake and did not use up too much more fondant!
He also helped me lug the pieces to the car and to the banquet hall. They were quite big and surprisingly heavy! Also not forgetting the words of encouragement which helped prevent me from going insane! :)
*muaks* Thanks Darling!
This design was inspired by one done by The Pink Cake Box. I love the colours and the extra-wide tiers and the floating tiers effect caused by the styrofoam separators. I went through so many designs and in the end, even though this one was tougher to make due to the wide tier, I knew it was extra special. I checked with Michelle and sure enough, she loved it too.
So here it is, my very first (and also very likely my last!) wedding cake!!
In the end I don't think a lot of people even noticed the cake, because it was sitting on the side of the stage in the dim romantic lighting.
But I don't mind. I loved it and the bride loved it, so, "Mission accomplished!!"
My daughter Annie volunteered me (without asking me first!) to make a cake for her teacher's birthday! It has been quite a while since I made a decorated cake, so I agreed anyway.
I used the Wilton gumpaste I had made previously, to create some flowers. I just cut a simple five petal flower and veined the petals and stuck on some pretty-coloured non pareils which I had just bought. Then I wired them and stuck them into the cake which I covered in white fondant and green and yellow stripes.
The cake is two layers of 6" round "Hershey's Perfectly Chocolate Cake", only I used Van Houten cocoa powder as opposed to Hershey's cocoa powder, because you just can't find that in my part of the world.
I decided to make chocolate cake because it's usually safest with kids. I chose the Hershey's recipe because it uses cooking oil instead of butter. I realized, last minute, that I was all out of butter! (I only had half a stick left which was just enough for the buttercream).
For the frosting, I just dumped together butter, icing sugar and cocoa powder. Just adjust the quantities until you get the taste and texture which you like.
I haven't baked for weeks, so last night, to get rid of the baking bug(and also because I didn't have anything for the kids to bring to school in the morning), I baked some pecan brownies as well as batch of brownie cupcakes (I'll put those in the next post).
I love my Linda Collister book, simply entitled, "Brownies". The ingredients and methods used are simple and straight-forward, yet yield glorious results! Besides, yummy, dense, fudgy brownies are a sure hit with just about anybody!
I had a packet of pecans which had been sitting around for a while, so I decided to make the 'Old-fashioned brownies' and replace the walnuts with pecans instead. Unfortunately, when I toasted my pecans in the oven, I managed to burn them (one of the many hazards of multi-tasking). Luckily I had some extra left, but it was less than the required amount, so my brownies turned out a little too sweet, because there were not enough nuts to balance out the sweetness.
The overall texture however was simply divine. When baking brownies and checking for doneness, it's always better to err on the undercooked side. Under-baked 'fudgy'ness is much preferred to over-baked dryness.
So, anyway, this is the recipe below, with the walnuts being replaced by pecans in the right amount (i.e.: not the amount I used!) :)
Oh yes, they are called old-fashioned because they use only cocoa powder, instead of plain chocolate and cocoa powder. That is how is was done, traditionally; only cocoa powder was used, to balance out the large amount of sugar required to produce the fudgy texture.
Old-fashioned Brownies
100g pecan pieces 4 large free-range eggs 300g castor sugar 140g unsalted butter, melted 1/2 teaspoon vanilla essence 140g plain flour 75g cocoa powder a 20.5cm x 25.5cm brownie tin, greased and base-lined (I just used a 9"x9" shallow tin)
Preheat the oven to 170 degrees C (325 degrees F). Put the pecan pieces in tray and lightly toast in the oven for about 8-10 minutes. (I strongly recommend you keep and eye on them!) Remove from the oven and leave to cool. Don't turn off the oven!
Meanwhile, break the eggs into a mixing bowl. Whisk until frothy, then whisk in the sugar. Whisk for a minute, then still whisking continuously, add the melted butter in a steady stream. Whisk for another minute, then whisk in the vanilla.
Sieve the flour and cocoa into the bowl and stir in with a wooden spoon. When thoroughly combined, stir in the nuts. Transfer the mixture to the prepared tin and spread evenly.
Bake in the preheated oven for about 25 minutes until a skewer inserted halfway between the sides and the centre comes out just clean. Remove the tin from the oven.
Leave to cool completely before removing from the tin and cutting into 16 pieces. Store in an airtight container and eat within 5 days. (They won't last that long, trust me...)
Did you guess Elmo? The eyes and nose were a dead giveaway right? :)
Anyway, quite a while back, a friend of mine requested that I make an Elmo cake for her son's 2nd birthday. I was reluctant at first, because I didn't have much confidence and did not want to ruin a little boy's second birthday by producing a lousy cake which looked horrible, or fell apart! It's different if it's your own children or nieces, and nephews... they're family and have to forgive you! hahaha :P
But since I love challenges, and my friend was giving me a lot of freedom to just make what I was comfortable with, I decided to forge ahead! There were some things which did not work out, but it still turned out pretty decent.
I'm happy I attempted this, because I love the resulting creation.
I had to start almost a week before the birthday party, because there are lots of parts which need days to dry out and harden.
First I made Elmo's body parts. I made his torso, head and arms from Rice Krispies and eyes and nose from gumpaste.
To make the Rice Krispies, you need 50g of marshmallows for every cup of Rice Krispies. You're supposed to microwave the mallows, but since I do not own a microwave oven, I melted them over the stove. Then you just stir in the Rice Krispies and when the mixture has cooled down, you mold them into the shapes you want and leave them overnight to dry hard. Mine were still a bit soft after a few days and even a couple of nights under air-conditioning! (might be due to not using a microwave)
I initially wanted Elmo's arms to reach upwards, but when I later tried to secure the arms in place by skewering them with toothpicks, they threatened to fall apart! So in the end I just glued the arms to Elmo's side with royal icing and prayed hard. I had to prop one arm with toothpicks while drying because it was coming apart! On hindsight, I think I will mold Rice Krispies over a wire frame in the future.
Gumpaste is just fondant with gum tragacanth added for extra firmness. It dries hard. I initially made Elmo's eyes and nose from Rice Krispies as well, but when I covered them with fondant, they were still really bumpy no matter how I rolled them. So, I had no choice but to make the whole thing from gumpaste. This made the front of Elmo's face very heavy when I attached them on later and it looked like Elmo's head was about to topple forward!! Horror of horrors!
I remedied this by sticking a long bamboo skewer down his head and right out the bottom. Before that he was only held up by short toothpicks. I think next time I try something like this, the torso or base should be made of something heavier like cake.
'Sigh'... I still have nightmares of Elmo's head rolling off in front of a bunch of kids!! I'm definitely going to use a lot of wires the next time I work with Rice Krispies. (This is the first time)
I also made a lot of other pieces earlier, the ones which needed to be hard and thus had to be made of gumpaste and not fondant. Everytime I had some free time, I would quickly make a few pieces. You really have to plan ahead for a large project such as this.
Anyway, next was to make red royal icing. I chose to use royal icing instead of buttercream because royal icing will survive transportation better. Royal icing, buttercream or even fondant, whatever icing it is, it is sooooo hard to make it super red or super black! Because of this, I am considering buying an airbrush!
I think I used half a small bottle of Wilton Christmas red, half a bottle of darker red and some black before I got an acceptable shade of red. Still not what I wanted initially, but it would do. Because of all this liquid in the form of food colouring, the royal icing was rather thin and took days and days under the air-cond to dry, and even then it was not totally hard and was crumbly.
I first stuck Elmo's head on with toothpicks and then glued on the arms with icing. Then I covered him with a layer of icing in case the lighter coloured Rice Krispies show through the "fur".
After sticking on the eyes and nose with more toothpicks, I began to pipe on the fur using a small star nozzle. Because the icing was a bit runny, the grooves of the star didn't really show, but that was okay. It made quite a natural 'gruffy' look. This fur piping was quite tedious work. It's another thing I've never tried before.
I prayed that Elmo's arm would stick and his fur would harden, and most of all he would not lose any body parts!!
After that, assembling the cake was the usual stuff. I baked two 9" square American chocolate cakes which I levelled, then crumb coated with chocolate buttercream.
During the morning of the party (luckily it was at night), I had to rush out to get a 12" cake board, a large cake box, candles and knife. I had run out and forgot to replenish.
Then I covered the cake in blue fondant and stuck everything else on.
I am a bit of a perfectionist and there are a few things which irritate me; 1. Elmo is slanting a bit, and is also looking slightly to the left. 2. his eyes are too big, making him look like he's suffering from hyperthyroidism. 3. his left arm looks dislocated. 4. he is "shedding fur" because the royal icing is too crumbly. (thus causing irritating red spots on my blue fondant!!)
Well, other than that, I think I did a great job. It was stressful yet fun... I really hope Little Jarod will be delighted! At the end of the day, that's where the most joy and satisfaction comes from when making children's cakes for their special day!
P/S: thanks to the friend who ordered the cake, I have so many photos of the whole process. She requested I capture it on film (can you still say that when it's digital??), which is what I usually intend to do, but always forget when I get too engrossed with the task at hand. (also my hands are usually covered in corn flour or Crisco, so right now my camera is a bit oily and quite fair!)
My niece Alaena celebrated her 5th birthday last Sunday. She's a pretty, young lady who loves looking beautiful! So I knew she would love a girly tiara cake full of sparkle and fluff!
I baked two round American Chocolate cakes. The bottom tier was 9" and the top was 6". I covered the tiers with purple and pink fondant.
The tiara is hand made from gumpaste. I initially intended to use a plastic toy tiara, but couldn't find one! I had no time to go around searching, because we were busy with house renovations and also a close friend's wedding. Thus, I made the tiara, without knowing if it would harden right and turn out okay. Luckily it turned out fine, though I had to use 3 toothpicks for extra support.
I also only had 2 hours to assemble the cake, as we had partied till 3-4am the night before, after the wedding dinner! Thank goodness for toothpicks; an essential and oh-so-flexible cake decorating tool! (If you look carefully you can see that the cake is also slanting a bit! I had no time to rectify that!)
The whole cake is edible except for the toothpicks, the pink fur trim at the bottom, and the dowel rods in the bottom tier which is used to support the top tier.
I absolutely love food and I adore all things beautiful! So what else could possibly surpass gorgeously decorated cakes, cookies, pastries and such? They're beautiful, and even better, they're edible! Therefore, I have decided to teach myself baking and cake decorating and I shall document my attempts on this, my humble blog. Wish me luck!
Christmas party @ Tebedu
-
packing gifts - assembly line style
So every year, we help out at a church at Tebedu, which is near the
Indonesian border. We pack simple gifts, sponsore...
NO MORE ORDERS
-
*NOTICE*
DEAR ALL, I'M SORRY TO ANNOUNCE THAT DUE TO TIME CONSTRAINTS, I WILL NOT BE
TAKING ON ANYMORE ORDERS FOR THE MEANTIME.
CHEERS!!
PRISCILLA
Memories 2009-2010
-
May 2009: Chuo sisters learning to dive at Waterpark, BDC, Kuching.
2009: Talang-Talang Island, Kuching, Sarawak, Malaysia.
*2009:* Talang-Talang Isla...